Continuous Security for Rails apps with Pipeline and Brakeman
|
This is a guest post by R. Tyler Croy, who is a long-time contributor to Jenkins and the primary contact for Jenkins project infrastructure. He is also a Jenkins Evangelist at CloudBees, Inc. |
When the Ruby on Rails framework debuted it changed the industry in two noteworthy ways: it created a trend of opinionated web application frameworks (Django, Play, Grails) and it also strongly encouraged thousands of developers to embrace test-driven development along with many other modern best practices (source control, dependency management, etc). Because Ruby, the language underneath Rails, is interpreted instead of compiled there isn’t a "build" per se but rather tens, if not hundreds, of tests, linters and scans which are run to ensure the application’s quality. With the rise in popularity of Rails, the popularity of application hosting services with easy-to-use deployment tools like Heroku or Engine Yard rose too.
This combination of good test coverage and easily automated deployments makes Rails easy to continuously deliver with Jenkins. In this post we’ll cover testing non-trivial Rails applications with Jenkins Pipeline and, as an added bonus, we will add security scanning via Brakeman and the Brakeman plugin.

Topics
For this demonstration, I used Ruby Central's cfp-app:
A Ruby on Rails application that lets you manage your conference’s call for proposal (CFP), program and schedule. It was written by Ruby Central to run the CFPs for RailsConf and RubyConf.
I chose this Rails app, not only because it’s a sizable application with lots of tests, but it’s actually the application we used to collect talk proposals for the "Community Tracks" at this year’s Jenkins World. For the most part, cfp-app is a standard Rails application. It uses PostgreSQL for its database, RSpec for its tests and Ruby 2.3.x as its runtime.
|
If you prefer to just to look at the code, skip straight to the Jenkinsfile. |
Preparing the app
For most Rails applications there are few, if any, changes needed to enable continuous delivery with Jenkins. In the case of cfp-app, I added two gems to get the most optimal integration into Jenkins:
-
ci_reporter, for test report integration
-
brakeman, for security scanning.
Adding these was simple, I just needed to update the Gemfile and the
Rakefile in the root of the repository to contain:
# .. snip ..
group :test do
  # RSpec, etc
  gem 'ci_reporter'
  gem 'ci_reporter_rspec'
  gem "brakeman", :require => false
end# .. snip ..
require 'ci/reporter/rake/rspec'
# Make sure we setup ci_reporter before executing our RSpec examples
task :spec => 'ci:setup:rspec'Preparing Jenkins
With the cfp-app project set up, next on the list is to ensure that Jenkins itself is ready. Generally I suggest running the latest LTS of Jenkins; for this demonstration I used Jenkins 2.7.1 with the following plugins:
I also used the
GitHub
Organization Folder plugin to automatically create pipeline items in my
Jenkins instance; that isn’t required for the demo, but it’s pretty cool to see
repositories and branches with a Jenkinsfile automatically show up in
Jenkins, so I recommend it!
In addition to the plugins listed above, I also needed at least one Jenkins agent with the Docker daemon installed and running on it. I label these agents with "docker" to make it easier to assign Docker-based workloads to them in the future.
Any Linux-based machine with Docker installed will work, in my case I was provisioning on-demand agents with the Azure plugin which, like the EC2 plugin, helps keep my test costs down.
|
If you’re using Amazon Web Services, you might also be interested in this blog post from earlier this year unveiling the EC2 Fleet plugin for working with EC2 Spot Fleets. |
Writing the Pipeline
To make sense of the various things that the Jenkinsfile needs to do, I find
it easier to start by simply defining the stages of my pipeline. This helps me
think of, in broad terms, what order of operations my pipeline should have.
For example:
/* Assign our work to an agent labelled 'docker' */
node('docker') {
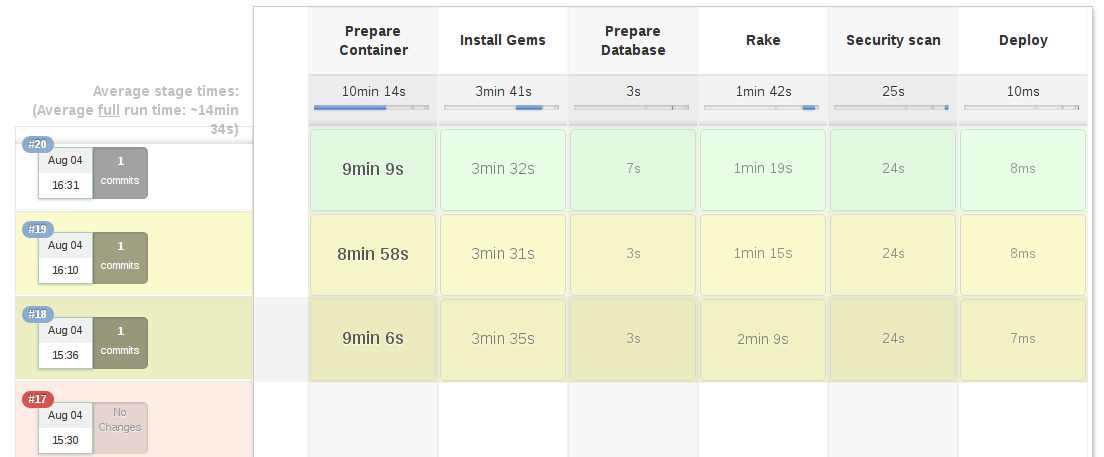
    stage 'Prepare Container'
    stage 'Install Gems'
    stage 'Prepare Database'
    stage 'Invoke Rake'
    stage 'Security scan'
    stage 'Deploy'
}
As mentioned previously, this Jenkinsfile is going to rely heavily on the
CloudBees
Docker Pipeline plugin. The plugin provides two very important features:
-
Ability to execute steps inside of a running Docker container
-
Ability to run a container in the "background."
Like most Rails applications, one can effectively test the application with two
commands: bundle install followed by bundle exec rake. I already had some
Docker images prepared with RVM and Ruby 2.3.0 installed,
which ensures a common and consistent starting point:
node('docker') {
    // .. 'stage' steps removed
    docker.image('rtyler/rvm:2.3.0').inside { (1)
        rvm 'bundle install' (2)
        rvm 'bundle exec rake'
    } (3)
}| 1 | Run the named container. The inside method can take optional additional flags for the docker run command. |
| 2 | Execute our shell commands using our tiny sh step wrapper
rvm. This ensures that the shell code is executed in the correct RVM environment. |
| 3 | When the closure completes, the container will be destroyed. |
Unfortunately, with this application, the bundle exec rake command will fail
if PostgreSQL isn’t available when the process starts. This is where the
second important feature of the CloudBees Docker Pipeline plugin comes
into effect: the ability to run a container in the "background."
node('docker') {
    // .. 'stage' steps removed
    /* Pull the latest `postgres` container and run it in the background */
    docker.image('postgres').withRun { container -> (1)
        echo "PostgreSQL running in container ${container.id}" (2)
    } (3)
}| 1 | Run the container, effectively docker run postgres |
| 2 | Any number of steps can go inside the closure |
| 3 | When the closure completes, the container will be destroyed. |
Running the tests
Combining these two snippets of Jenkins Pipeline is, in my opinion, where the power of the DSL shines:
node('docker') {
    docker.image('postgres').withRun { container ->
        docker.image('rtyler/rvm:2.3.0').inside("--link=${container.id}:postgres") { (1)
            stage 'Install Gems'
            rvm "bundle install"

            stage 'Invoke Rake'
            withEnv(['DATABASE_URL=postgres://postgres@postgres:5432/']) { (2)
                rvm "bundle exec rake"
            }
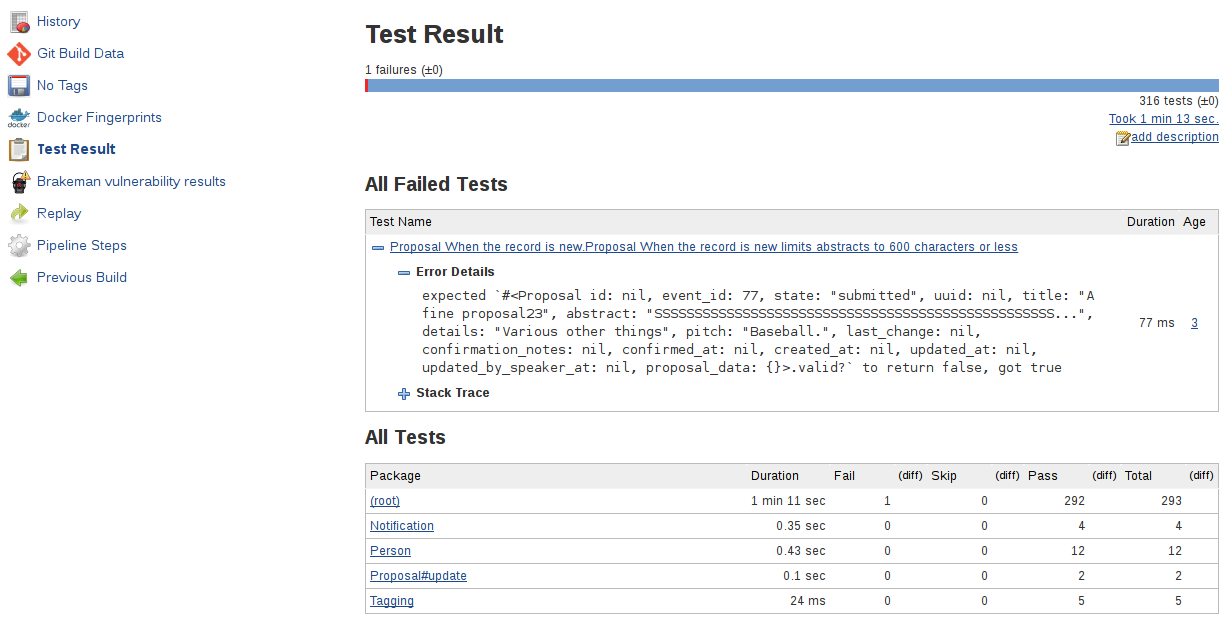
            junit 'spec/reports/*.xml' (3)
        }
    }
}| 1 | By passing the --link argument, the Docker daemon will allow the RVM container to talk to the PostgreSQL container under the host name 'postgres'. |
| 2 | Use the withEnv step to set environment variables for everything that is in the closure. In this case, the cfp-app DB scaffolding will look for the DATABASE_URL variable to override the DB host/user/dbname defaults. |
| 3 | Archive the test reports generated by ci_reporter so that Jenkins can display test reports and trend analysis. |

With this done, the basics are in place to consistently run the tests for cfp-app in fresh Docker containers for each execution of the pipeline.
Security scanning
Using Brakeman, the security scanner for Ruby
on Rails, is almost trivially easy inside of Jenkins Pipeline, thanks to the
Brakeman
plugin which implements the publishBrakeman step.
Building off our example above, we can implement the "Security scan" stage:
node('docker') {
    /* --8<--8<-- snipsnip --8<--8<-- */
    stage 'Security scan'
    rvm 'brakeman -o brakeman-output.tabs --no-progress --separate-models' (1)
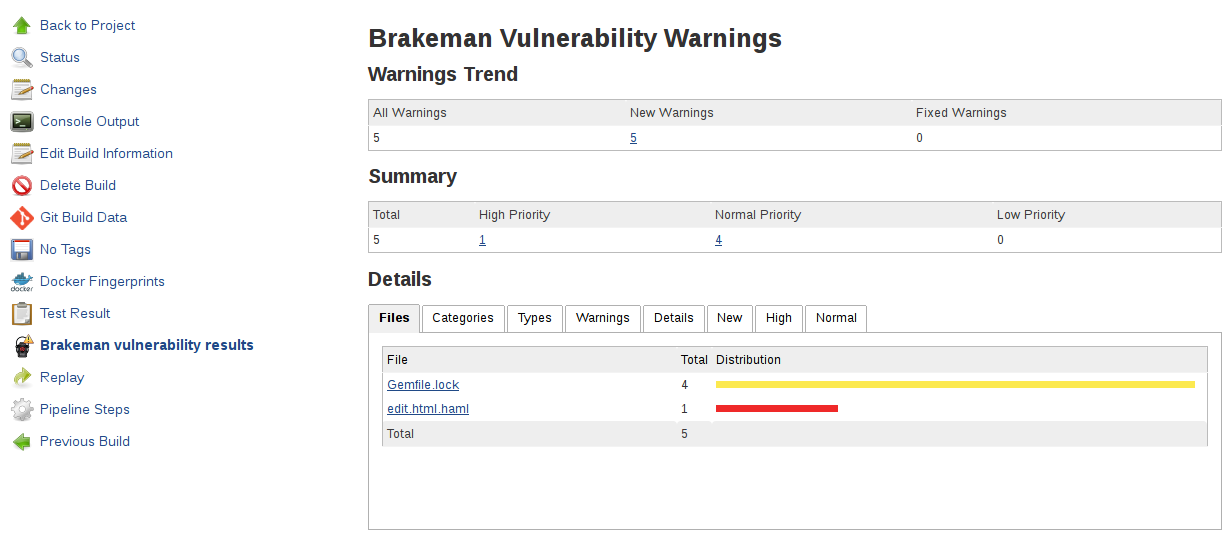
    publishBrakeman 'brakeman-output.tabs' (2)
    /* --8<--8<-- snipsnip --8<--8<-- */
}| 1 | Run the Brakeman security scanner for Rails and store the output for later in brakeman-output.tabs |
| 2 | Archive the reports generated by Brakeman so that Jenkins can display detailed reports with trend analysis. |

|
As of this writing, there is work in progress (JENKINS-31202) to render trend graphs from plugins like Brakeman on a pipeline project’s main page. |
Deploying the good stuff
Once the tests and security scanning are all working properly, we can start to
set up the deployment stage. Jenkins Pipeline provides the variable
currentBuild which we can use to determine whether our pipeline has been
successful thus far or not. This allows us to add the logic to only deploy when
everything is passing, as we would expect:
node('docker') {
    /* --8<--8<-- snipsnip --8<--8<-- */
    stage 'Deploy'
    if (currentBuild.result == 'SUCCESS') { (1)
        sh './deploy.sh' (2)
    }
    else {
        mail subject: "Something is wrong with ${env.JOB_NAME} ${env.BUILD_ID}",
                  to: 'nobody@example.com',
                body: 'You should fix it'
    }
    /* --8<--8<-- snipsnip --8<--8<-- */
}| 1 | currentBuild has the result property which would be 'SUCCESS', 'FAILED', 'UNSTABLE', 'ABORTED' |
| 2 | Only if currentBuild.result is successful should we bother invoking our deployment script (e.g. git push heroku master) |
Wrap up
I have gratuitously commented the full
Jenkinsfile
which I hope is a useful summation of the work outlined above. Having worked
on a number of Rails applications in the past, the consistency provided by
Docker and Jenkins Pipeline above would have definitely improved those
projects' delivery times. There is still room for improvement however, which
is left as an exercise for the reader. Such as: preparing new containers with
all their
dependencies
built-in instead of installing them at run-time. Or utilizing the parallel
step for executing RSpec across multiple Jenkins agents simultaneously.
The beautiful thing about defining your continuous delivery, and continuous security, pipeline in code is that you can continue to iterate on it!